Wednesday, July 24, 2013

Daily 5 wrap up {freebies!}

Hi Friends!
I will be wrapping up my Daily 5 series in this post.  

ps.. did you like the posters that I had each time?  I have a variety of them as a facebook freebie.  Head to my FB page and click the purple box to get them all! 

I've had the BEST comments and heard the nicest things.  I am so glad that the posts have been helpful to you!
In case you are just finding me, you can read about all the posts here:
Read to Self
Read to Someone
Work on Writing
Word Work
Listening to Reading

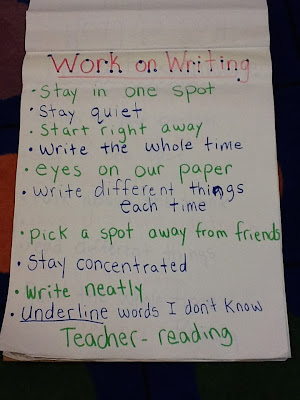
I just wanted to share a few more things.  First, I went to my school and took a picture of my anchor charts.  Now...I CLEARLY was in a hurry when making these this past year.  Usually I try and cutesy these up a bit more.  But you will get the idea.


And my handwriting is all wonky too! Ugh.  Don't tell anyone I showed you these ;)

When creating these charts with my class I actually have a "cheat sheet" that I use to help me remember the way to guide the discussion.  It is a flip book and it looks like this:
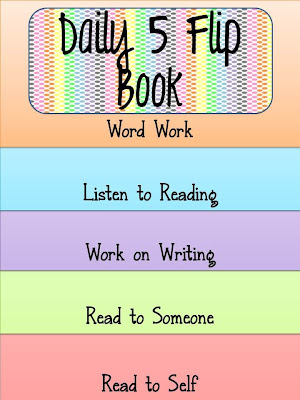
Now It is not this colorful- this is just a sample of what it would look like.  I have the printer friendly version for you.  Just click on the pic above and it will tell you how to make it.
(I haven't printed this one yet as I made this one fresh and new- can someone please print it out and tell me if it worked- my printer is not working--- boo!!  THANKS!!)

We also talked about the word collector that the kids keep in their book boxes.  I FORGOT all about the giant class word collector that I have hanging on my door.  This was just made from poster board and laminated- kids love it! :)

Again, ignore the shape this is in... usually it's full of colorful words! :)

Here is a pic of my stamina graphs that we talked about.  These graphs look pretty good- usually the kids last a minute before we have to stop.  I laminate the graphs and use them year after year.

It will be important for you to create a signal for your class -especially when you are building their stamina.
I use this wand that makes the best chime sound.  It is only $4.95 and you can check them out HERE.
5-pointed star

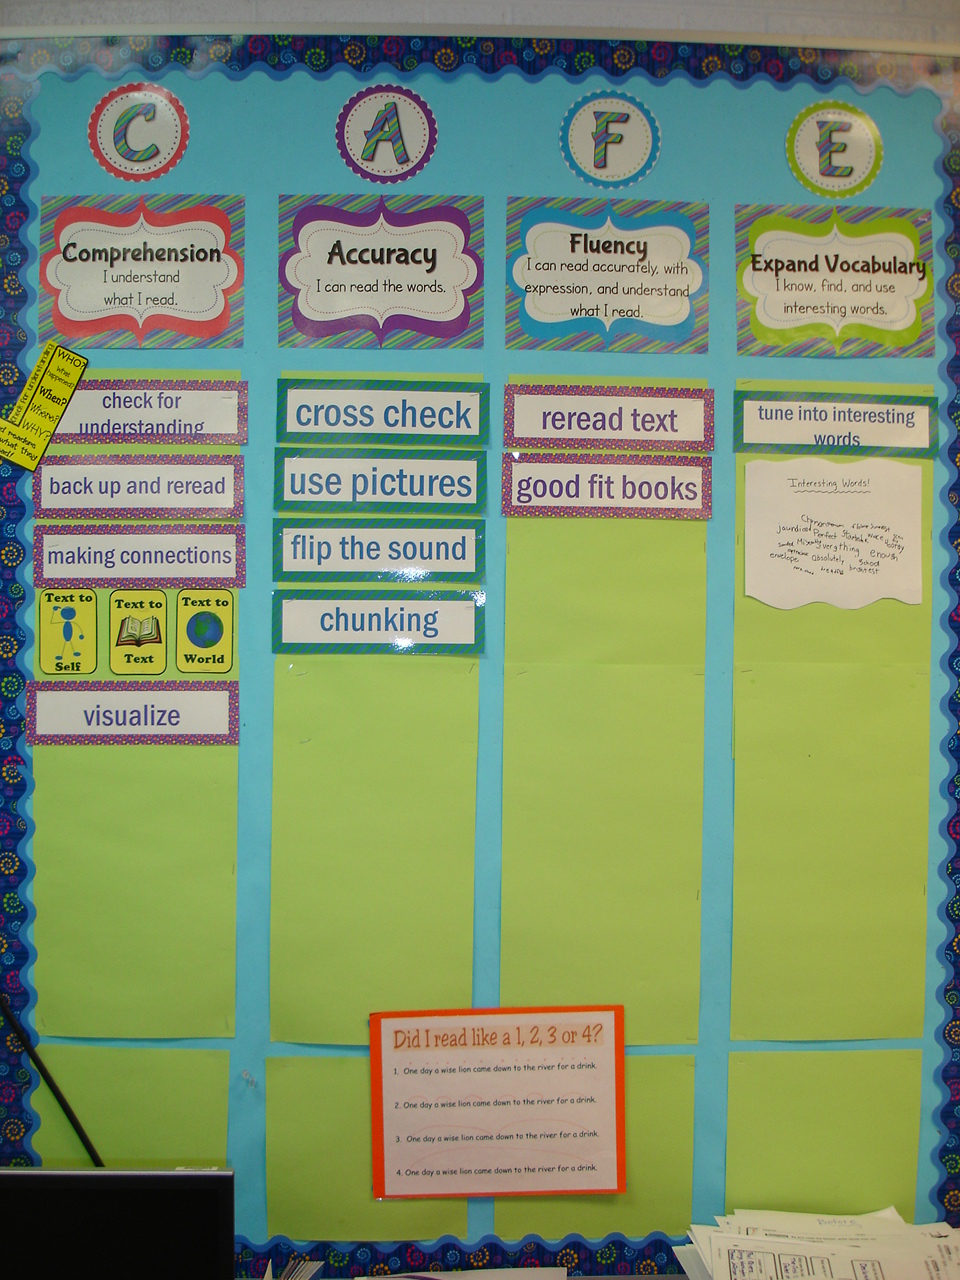
Finally, I mentioned CAFE here and there.  I highly recommend you get that book and read it!  I describe D5/CAFE as ....

Daily 5 is the bones and CAFE is the meat.

  I LOOOVE CAFE and it has really transformed the way I teach reading.  And you get to create a cute bulletin board!
Get the book, read it, and do both Daily 5 and CAFE- you won't be sorry! :)
Product Details


Product Details


So I leave you with something that I wrote when I did a presentation to our school staff.  I hope it gives you a little taste of how I truly feel about Daily 5!

What really drew me to the Daily 5 was my struggle with constantly needing to create cutesy center activities or copying stacks of worksheets to keep the kids “busy” while I pulled guided reading groups.  The 5 choices of Daily 5 just made sense- I thought “why didn’t I think of this!”  Giving the students the choice of reading and writing time was an ah ha moment.  I’ll never forget the time when I was first letting the children make their choice and we were on our second round, I had a child say to me can I choose “read to self” again?  I was like YES, yes you can!  How amazing that feeling was that I had students choosing to READ and wanted to READ!  My students now beg for daily 5 and are thrilled when they get to curl up in the corner with a book in hand- it is such an amazing thing to look around the room and see the entire class so engaged in such meaningful activities and know that all these activities will enhance their reading skills.  Now during my guided reading time I don’t have to worry about a center finishing too early or if I explained the list of worksheets well enough so they don’t interrupt me, they all know what to do and they are completely self motivated and independent workers!  Last thing-just the other day I was with a group and I heard noise coming from my reading corner so I thought… OK, here we go.. it’s December and my “D5 routine” is coming unglued.  So I get up and I see where all the noise was coming from… one of my ELL students was outstretched on the rug and half on the beanbag chair trying his hardest to sound out the words on the page of a book.  Then I smiled and thought… yes, this is what it is all about.  If the only noise I am worried about is a child trying hard to read, then my job is done here.  It was a proud moment. J

p.s... up next.... "What's in the box?"  
hmmm... I wonder!! :)

Saturday, July 20, 2013

FB hop is HERE!!!


Get ready to HOP people!!

So here is how this works...

Start by going to my FACEBOOK page.
Click on the green "BLOG HOP" button once you are there.  It looks like this:

Once you are there, you will see a whole list of bloggers.  Here is a snippet of what it looks like:

Start by clicking on the first button which will take you to my freebie.  

Download, save, print, whatever you want to do with that freebie and then close out those windows.  You want to get back to the list of bloggers on my Facebook page.  Everything should open up into a new window to make it easier for you to get back to the "hop."

Make your way through all the bloggers as they will ALL have FAB stuff for you...for FREE!!!  Make sure you like the page to get your free product.

Oh and say "Hi" and "Thanks" while you are there... we love your comments/feedback!

THEN... once you do all that... go back to the blogger list one last time and enter the rafflecopter for a chance to win a product of your choice from ALL of our stores!!!

Wowsers!!

Ok.. what are you waiting for... GO!!
PS.... this all ends on Sunday night- midnight!!

Thursday, July 18, 2013

Daily 5- Word Work! {giant freebie!}


Hey Friends!

I have been SO impressed with the comments left on these posts- thank you so much!  The winner from the last post is...
This is a fun comment- thanks Deb! :)


Here we go...

Let me first show you how I store my word work:
I got this at Target for like $25 I think.  I like having the large drawer at the bottom to hold the bigger stuff.

I had cutesy labels for each drawer but they kept ripping so my FAB aide from a few years ago made these for me and they are holding up beautifully~  the key is to laminate and then cover with packing tape or contact paper.  Those little hands are destructive and you don't want to have to constantly redo your beautiful work. :)

So let's take a look in each drawer...
This is my dry erase drawer.  It is simple- write your words on the dry erase board. :)  Usually there are erasers in this drawer but they escaped at the end of the year.
I will give you a link at the end for all the papers I show in the post. This is a direction sheet that stays in the drawer for the kids- they know to read the directions about what is needed if they forget (instead of asking me).

OH side note--- I use my spelling words for the week as my word work.  I find that works the best and we can focus on that phonics sound for the week.  
I store the word lists on the side of my word word container like this:
I have 2 lists challenge and regular. I call them list 1 and list 2.

Next drawer...
Colorful words- put makers in a bag and then the kids write their words in a colorful way.  I have the kids do this in their "word work" notebook which is just a section of a spiral notebook.

Next...
Stamps.  These little guys came from Target dollar spot- keep your eyes peeled as I usually seem them come out in August.  I believe I got the little containers from Staples.

I have a separate sheet where the kids stamp their words-

Next up...
The most popular drawer!  That is why there is only one lonely play-doh left in this drawer!  The white basket is usually full of popsicle sticks.  They are used for writing the words on a "pancake" style play-doh instead of forming each letter.  I give them the option because sometimes forming the word just takes too long.


Bottom drawer...
(lots of goodies)


These are bottle caps- water bottle caps to be specific.  I collected them during the summer and had friends collecting for me too (its not too late to start collecting!)  I got the container from JoAnns.  I added a white circle sticker to the top of the bottle cap.
The kids use the letters to spell out their words- another favorite!

Also in the bottom drawer....


These are just foam letters from Michaels.


Stencils!  The kids love these! :)


Hard to tell as these got mangled but they are Wikki Stix!  The kids had a lot of fun with these and I need to buy more!

Finally, the amazing reading specialist at my building had a great idea of using an old keyboard to "type" out their words...
What a fun idea!  I have some keyboards ready to go for this year.

If you don't have a word work notebook... I have created a cover and paper you could use to make your own!


If you like the papers I have included in this post you can grab them all at my Facebook Page OR on TpT HERE 
Please leave me some love if you like it! :)


click here to get it!

I spend a LOT of time building stamina on:
~how to get the supplies
~where to do word work
~what to do for each activity
~how to work the whole time on word work
~how I should act during word work
~how to clean up
~how to put materials back

Oh- and I try to stick to around 5 different activities.  I shared more than that here.  I don't do them all at the same time- I add new ones about every quarter.

I hope that helps a bit so that you can get your word work up and running!

Thanks for reading!!

Monday, July 15, 2013

Monday Made It!!

Hey everyone!  Please tell me it is NOT the middle of July already!  Ugh!!

Every stinkin' summer I say the same thing...
where has the summer gone!

I'm trying my hardest to slow summer down for us all...
unfortunately it is full speed ahead. :/

I am, however, SO super excited to link up with Tara for Monday Made It!


This is my first "Monday Made It" this summer!  For some reason have been lacking my motivation this summer- I NEED to kick it into high gear!

For those of you who have been reading my Daily 5 posts, I promise you that I am working on the last one for Word Work and it should be up in the next day or two! :)

So I have two quick projects to share today!

PROJECT #1

The first was inspired by a post from the lovely Amanda Madden last summer.  For some reason this project never left my brain- for a WHOLE year I thought about making this.

OK cuteness overload!  So see the pencil container on the far left- how cool is that??
(I love the eraser holder too- that just might be next!)

So I went on a search and found a straw dispenser on eBay
I think it was around $15 plus shipping.

And it came looking just like you see above.
(I forgot to take a pic of mine before decorating :)


I added the word "pencils" as you see below:


The lettering is from Michaels.

I decided that it needed more so I added some washi tape dots:

Nice! I'm lovin' the washi tape- so easy to use!

For some reason I want to still see the pencils which is why I didn't cover the whole inside- but that is something you could easily do as the top just slides open.  I think I wanted to be able to see quickly how many pencils were left in there.


You just spin the little knob and out comes the pencil... just like the straw dispenser!
It's so fun and my 5 year old definitely approves! 
(as he has tested it out about a zillion times!)

Now I can keep my pencils fully STOCKED- I just hope that this doesn't create the "I need to get up and turn the  knob to get a pencil just because it is fun" kid.  ;)


PROJECT #2!

The second was inspired by Rowdy in Room 300 (she posted it to Instagram- man I love to see everyone's pics on there!)


Is that not the cutest!  It is a chore chart for her daughter.  We have a chart for my son but it is one of those long list paper/pencil ones and he was NOT into it.
I needed something new- so glad Nicole posted hers!

Because it was on Instagram I wasn't sure what she used to make it.  So I went to my classroom and dug up some materials there
(I didn't want to spend any extra money).


Here are the things I used:
Cookie sheet
Magnetic tape
Sticker Chart (you will see why)
Duct tape
And washi tape (not pictured)

I first added the duct tape onto the cookie sheet covering the front (not the back).
I added washi tape over the duct tape to create a dividing line.
It is surprising how quick and easy it is to use both of these products!

I then used the sticker chart by cutting off the cute bear at the top.  I wrote a "chore" on its belly and attached magnetic tape to the back.


I then used the left over bottom part of the sticker chart to make the "to do" and "done" labels.  I decided to cover the chart with washi tape to match the center dividing line:

Can't let the chart part go to waste!

I put it all together and it looks like this:


It is cute and oh so functional!  My little guy absolutely loves to check what still needs to be done and loves moving the bears to the "done" side.  It is working like a CHARM!

Mommy Success!!

As I was making it, my teacher brain turned on and I thought about all the things you could do with that simple creation for your centers!
Time to cute-ify your cookie sheets!

Thanks so much for reading and stopping by!

Don't forget to head over to 4th Grade Frolics and see other Monday Made It projects!


p.s... something BIG is in the works!!
I will give you one tiny hint:
(are you a second grade teacher/blogger with a FB page?  If so, leave your email below!)